Create your first Squid app

If you’re new to Squid, you’re in the right place! Follow along with this post to create your first application. Whether you're looking to build real-time chat applications, live dashboards, or any interactive platform, this tutorial serves as your gateway to understanding and utilizing Squid's real-time data capabilities. By the end of this post, you'll have a "blank canvas" Squid app ready for customization. So, grab your favorite IDE, and let's dive into the world of real-time application development with Squid!
What you’ll build
A counter application with a React frontend that serves as a great starting point to kick off whatever feature-rich app you want to build. This app showcases a button that increases a number with each click. By leveraging Squid's shared state and real-time features, all users view the same counter state and get instant updates whenever the value is altered. Squid Cloud makes it possible to add real-time capabilities in only a couple lines of code without having to spin up and manage your own backend infrastructure.

Key Takeaways
- Start building in minutes: This app is a mostly blank canvas with the outlines drawn for you to fill in however you like. Get up and running quickly and focus on building the features you want without worrying about the complexities of business logic.
- Discover Squid's flexibility: See how Squid makes developing real-time applications straightforward.
- Use Squid with React: Dive into integrating the Squid React SDK to make your app dynamic with real-time updates.
- Focus on some security: Understand the critical role of proper security rules to protect your app.
- Practical experience: Get a hands-on with a project from start to finish in minutes, enhancing your understanding of Squid's capabilities.
Prerequisites
- Previous experience with React is helpful, but not required.
- A Squid application. Create a new application in the Squid Cloud Console.
- Node.js v18 or later.
- The Vite CLI.
- The Squid Cloud CLI. Install the CLI using the following command:
npm install -g @squidcloud/cli
Let's dive in
This project starts with Vite’s React frontend app and incorporates real-time functionality using Squid. Note that while this example uses Vite, Squid works with all frontend and server platforms that use Node.js.
- Create a directory for the complete project, and then change to the new directory. This folder will hold the frontend and backend apps.
mkdir my-counter-app
cd my-counter-app
- Create the Vite frontend application using the following command:
npm create vite@latest my-counter-app-frontend -- --template react-ts
This command creates a React-based counter application, which is a great starting point for showcasing Squid's capabilities.
- If you haven’t done so already, now is a great time to open your project in your favorite IDE. Once in your IDE, open a new terminal window.
- This application is currently missing the Squid React SDK dependency as well as all other default dependencies. In the new terminal window, change to the frontend directory, and then install the dependencies:
cd my-counter-app-frontend
npm install # install default dependencies
npm install @squidcloud/react # install Squid React SDK
- Run the frontend app locally using the following command:
npm run dev
- Open the link shown in the terminal logs, which is most likely http://localhost:5173/. Currently, this application only alters the state of a local count, so you will notice that the number of clicks resets whenever you reload or open the link in another window. You will modify this application to utilize some of the Squid's features to enable the counter’s value to be shared among clients with real-time updates.
Initialize the Squid backend
For this real-time counter app, the Squid backend manages the frontend’s connection to Squid's built-in database and establishes a security rule that allows clients to access this shared counter state. Let’s initialize the Squid backend and examine the security functionality.
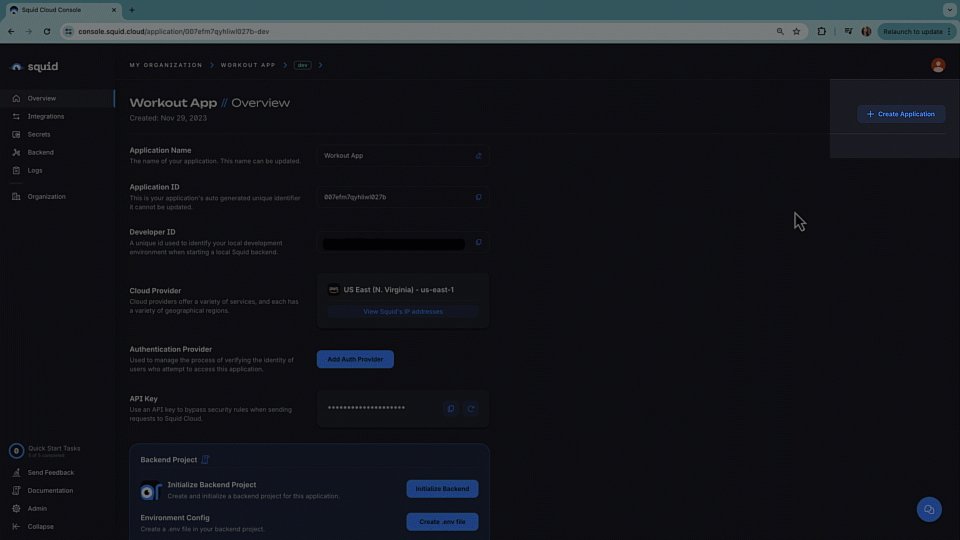
- If you haven't done so already, create a new Squid app in the Squid Cloud Console. If it's your first time visiting the console, you'll be prompted to create a new app. Otherwise, click Create application to create a new app.
- Navigate to your Squid application's overview page in the Squid Cloud Console, scroll down and click the
Initialize backendbutton, and then copy the initialization command. The command has the following format
squid init my-counter-app-backend \
 --appId YOUR_SQUID_APP_ID \
 --apiKey YOUR_SQUID_API_KEY \
 --environmentId YOUR_ENVIRONMENT_ID \
 --squidDeveloperId YOUR_SQUID_DEVELOPER_ID \
 --region YOUR_APP_REGION
- In your IDE, open a new terminal window. You should now have two separate terminal windows: one running the frontend app, and another in which you will run the backend app. In the new terminal window, change to the backend directory, and then run the Squid backend locally using
squid start:
cd my-counter-app/my-counter-app-backend
squid start
The backend and frontend are now both running locally and ready to start communicating!
- In the
my-counter-app-backend, open thesrc/service/example-service.tsand examine the contents. The file contains the following code:
export class ExampleService extends SquidService {
  // TODO: !!!IMPORTANT!!! - Replace this function with your own granular security rules
  @secureDatabase('all', 'built_in_db')
  allowAllAccessToBuiltInDb(): boolean {
    return true;
  }
}
This SquidService class is where you define your backend functionality like security rules, executables, APIs, schedulers, and much more. By default, client access to Squid resources is denied to prevent unwanted access. You must define security functions to declare under what conditions a client can access resources. The allowAllAcessToBuiltInDB() function is included by default with a backend project to enable you to get up and running with local development right away. However, this security rule is overly broad and is not recommended for use in a live application. Please refer to the security rule documentation to learn how to define more granular security rules.
For more information on the Squid backend, check out this video:
Add frontend environment variables
To use Squid in a client application, you must initialize a Squid instance with application parameters like your app ID and region. To make these values accessible to the React frontend, create a new .env file using the following steps:
- In the
my-counter-app-frontenddirectory, create a new file called.env.local. - In the
my-counter-app-backenddirectory, locate the file named.env. This file was initialized using thesquid initcommand. Copy the contents of this file into the.env.localfile you just created. - Remove the
SQUID_API_KEYvariable from the list. The API key gives full admin access to your Squid app, so it should only be used in the appropriate admin environment. For the frontend of this app, you want access to be limited to the specific Squid features required to use the counter. Your.env.localfile now has this format:
SQUID_APP_ID=YOUR_APP_ID
SQUID_REGION=YOUR_REGION
SQUID_ENVIRONMENT_ID=YOUR_ENVIRONMENT_ID
SQUID_DEVELOPER_ID=YOUR_SQUID_DEVELOPER_ID
- Modify the variable names in
.env.localto use theVITE_prefix. This is a requirement of Vite for accessing environment variables in the client. The final format for.env.locallooks like this:
VITE_SQUID_APP_ID=YOUR_APP_ID
VITE_SQUID_REGION=YOUR_REGION
VITE_SQUID_ENVIRONMENT_ID=YOUR_ENVRIONMENT_ID
VITE_SQUID_DEVELOPER_ID=YOUR_SQUID_DEVELOPER_ID
Add Squid to the frontend
- Open the file
my-counter-app-frontend/src/main.tsx. The contents looks like the following:
import React from 'react'
import ReactDOM from 'react-dom/client'
import App from './App.tsx'
import './index.css'

ReactDOM.createRoot(document.getElementById('root')).render(
  <React.StrictMode>
    <App />
  </React.StrictMode>,
)
- To use the Squid React SDK, modify this file to instantiate the
SquidContextProviderwith the environment variables you just defined. Replace the contents ofmain.tsxwith the following:
import React from 'react'
import ReactDOM from 'react-dom/client'
import App from './App.tsx'
import { SquidContextProvider } from '@squidcloud/react';
import './index.css'

ReactDOM.createRoot(document.getElementById('root')!).render(
    <SquidContextProvider options={{
      appId: import.meta.env.VITE_SQUID_APP_ID,
      region: import.meta.env.VITE_SQUID_REGION,
      environmentId: import.meta.env.VITE_SQUID_ENVIRONMENT_ID,
      squidDeveloperId: import.meta.env.VITE_SQUID_DEVELOPER_ID}}>
    <App />
    </SquidContextProvider>
);
Notice the usage of the import.meta.env.VITE_* settings. This is populated with the values in the .env.local file.
The SquidContextProvider enables your application to use the Squid React SDK's hooks, a robust feature that simplifies the use of Squid's real-time capabilities in React apps. In this app, you will add the useCollection and useDoc hooks to manage our shared counter state.
- Let's augment the
my-counter-app-frontend/src/App.tsxso it uses Squid's built-in database. Begin by updating the file’simportstatements. Add the following to theimportstatements block:
import { useCollection, useDoc } from '@squidcloud/react'
- Create a
CounterDocumenttype. This represents the shared counter state. Add the following after theimportstatements block:
type CounterDocument = {
  count: number;
}
- Change the
Appfunction so it uses a shared document in Squid to store the counter rather than a local state by deleting the currentcountfunctionality fromApp.tsx:
const [count, setCount] = useState(0); // remove this line
- Add the following to the
App()function:
const collection = useCollection<CounterDocument>('count');
const { data } = useDoc(collection.doc('count'), {
  subscribe: true,
});
This code uses a document with ID of count within the count collection in Squid's built in database to store the total number of clicks.
The data variable holds the shared CounterDocument ’s data. Notice that it is configured with subscribe: true which means it receives real-time updates. The subscribe attribute is true by default, but we’re still including it here for demo purposes. For more information on Squid collections and documents, view the documentation.
Update the counter
We need to write a function that updates this counter document value by initializing it with 0 in case the document does not exist, and increment the current value by 1 when the document does exist.
- Add the following function definition somewhere under the
Appfunction definition:
async function handleClick() {
  await collection.doc('count').insert({ count: (data?.count || 0) + 1 });
}
- Update the component so it displays the count and uses the
handleClickfunction. Locate the current button element:
<button onClick={() => setCount((count) => count + 1)}>
  count is {count}
</button>
Replace the button element with the following:
<button onClick={() => handleClick()}>
  count is {data?.count || 0}
</button>
And that's it! With these changes, we've transformed the starter Vite counter application to use a shared count state with real-time updates. Now, it's time to try it out!
Trying out the application
Since the client and backend servers are both running locally, any changes you make to them are updated automatically upon save.
- Ensure that your project files are saved, and then visit http://localhost:5173/ in your web browser.
- Click count is 0 a few times to increment the counter.
- Refresh the window. Notice the count remains at the previous increment instead of returning to 0.
- Open another browser tab and click the counter button. Notice the count updates simultaneously across multiple tabs.
Moving forward
You've reached the end of this tutorial and successfully built a simple, powerful Squid application. You've used Squid's shared state and real-time features to create a counter app that updates across all clients simultaneously. You can find the complete source code for this tutorial in the Squid starter project repository.
And this is just the start. Squid has many more features to explore. Explore Squid's documentation further to learn about its advanced security rules, data modeling, and sophisticated real-time data handling techniques. You can also check out the Integrations documentation to learn how to connect the databases, APIs, and other services you use with Squid.
If you have questions or feedback, or you want to share a project with the Squid crew, please reach out to us on our Discord server. We’d love to hear from you!